Set Up and Run a Fully Distributed Hadoop/HBase Cluster In (About) an Hour. [Quickstart]

[Edit 7/11/2013: This method has apparently been deprecated. See http://blog.cloudera.com/blog/2013/03/how-to-create-a-cdh-cluster-on-amazon-ec2-via-cloudera-manager/ for newer methods!]

Prologue:

I’m working on a project that requires slicing and dicing about 70GB of RDF data (something like 500 million lines)[1]. That’s almost doable on a single fast machine, but it’s more than can fit in main memory of even Amazon’s largest cloud server.

I spent a while experimenting with different single-machine algorithms and data structures, tried using Postgres as a big hash table, and tried a variety of NoSQL solutions. All that experimenting made it abundantly clear that there’s only one reasonable solution – bite the bullet and move to using Hadoop for processing and HBase for storage.

As you may know, Hadoop is a tool that lets you write “MapReduce” jobs that split work across a number of different computers (“map”) and then reassemble the results (“reduce.”) HBase is a database appears that lets you store data across a number of different computers. They’re both clones of the infrastructure that powered the early Google indexing system (“MapReduce” and “BigTable” respectively), and both are in heavy industrial use at places like Facebook.

I won’t try to sell you on using them, but if you’re facing a certain class of problems these tools are a godsend. The magic is that once you’ve got them configured, you can speed up your programs (mostly) linearly by simply conscripting more computers [2]. At the moment, a “large” instance on Amazon’s cloud costs $0.32/hr, so you can make a program run 10x faster for just $3 more per hour.

The downside of Hadoop and HBase is that they are really freakin’ complicated, especially for a n00b like me who is just getting started with programming. It took me quite a long time to get a cluster up an running.

But along the way, I realized that about 90% of the complexity of these tools is either in:

Getting them configured to not explode on the launchpad

2)  Performance tweaks that are only necessary for exceptionally strenuous use-cases.

The goal of this post is to help you skip that complexity and just get going as fast as possible. I’m going to walk you through a (relatively) simple set of steps that will get you running map-reduce programs on a 6-node distributed Hadoop/Hbase cluster as fast as possible.

This is all based on what I’ve picked up reading on my own; so if you know of better/faster ways to get up and running, please let me know in the comments!

Summary:

We’re going to be running our cluster on Amazon’s EC2. We’ll be launching the cluster using Apache’s “Whirr” program and configuring it using Cloudera’s “Manager” program.  Then we’ll run some basic programs I’ve posted on Github that will parse data and load it into Hbase.

All together, this tutorial will take a bit over one hour and cost about $10 in server costs.

Part I: Get the cluster running.

[EDIT: A commenter pointed out to me that there is a tool to launch the control node AND the cluster at the same time in one go. You can find it here: https://github.com/tomwhite/whirr-cm). The downside is that it only runs CentOS instead of Ubuntu, but that’s probably worth it to let you skip to Part III.]

Part I(a): Set up EC2 Command Line Tools

I’m going to assume you already have an Amazon Web Services account (because it’s awesome, and the basic tier is free.) If you don’t, go get one. Amazon’s directions for getting started are pretty clear, or you can easily find a guide with Google. We won’t actually be interacting with the Amazon management console much, but you will need two pieces of information, your AWS Access Key ID and your AWS Secret Access Key.

To find these, go to https://portal.aws.amazon.com/gp/aws/securityCredentials. I won’t show you a screen shot of my page for obvious reasons :).  You can write these down, or better yet add them to your shell startup script by doing

$ echo "export AWS_ACCESS_KEY_ID=<your_key_here>" > ~/.bashrc 
$ echo "export AWS_SECRET_ACCESS_KEY=<your_key_here>" > ~/.bashrc
$ exec $SHELL

You will also need a security certificate and private key that will let you use the command line tools to interact with AWS. From the AWS Management Console go to Account (top left) then “Security Credentials” and in “Access Credentials” select the “X.509 Certificates” tab and click on “Create a new Certificate”. Download and save this somewhere safe (e.g. ~/.ec2)

Then do

 $ export EC2_PRIVATE_KEY=~/.ec2/<your_key>.pem
$ export EC2_CERT=~/.ssh/<your_key>.pem

Finally, you’ll need a different key to log into your servers using SSH. To create that, do

 $ mkdir ~/.ec2
$ ec2-add-keypair --region us-east-1 hadoop | sed 1d > ~/.ec2/hadoop
$ chmod 600 ~/.ec2/hadoop
(to lock down the permissions on the key so that SSH will agree to use it.)

Part I(b): Make your Whirr control node

The computers that make up a cluster are called “nodes”, and you have the option of creating of manually creating a bunch of EC2 nodes[3], but that’s a pain.

Instead, we’re going to use an Apache Tool called “Whirr,” which is specifically designed to allow push-button setup of clusters in the cloud.

To use Whirr, we are going to need to create one node manually, which we are going to use as our “control center.” I’m assuming you have the EC2 command-line tools installed (if not, go here and follow directions.)

We’re going to create an instance running Ubuntu 10.04 (it’s old, but all of the tools we need run stably on it), and launch it in the USA-East region. You can find AMI’s for other Ubuntu versions and regions here (http://alestic.com/)

So, do…

$ ec2-run-instances ami-1db20274 -k "hadoop"

This creates an EC2 instance using a minimal Ubuntu image, with the SSH key “hadoop_tutorial” that we created a moment ago. The command will produce a bunch of information about your instance. Look for the “instance id” that starts with “i-”

image

then do:

$ ec2-describe-instance [i-whatever]

This will tell you the IP of your new instance (it will start ec2-) Now we’re going to remotely log in to that server.

$ ssh -i ~/.ec2/hadoop ubuntu@ec2-54-242-56-86.compute-1.amazonaws.com
 

Now we’re in! This server is only going to run two programs, Whirr and the Cloudera Manager. First we’ll install Whirr.  Find a mirror at (http://www.apache.org/dyn/closer.cgi/whirr/), then download to your home directory using wget:

$ wget http://www.motorlogy.com/apache/whirr/whirr-0.8.0/whirr-0.8.0.tar.gz
 

Untar and unzip:

$ tar -xvf whirr-0.8.0.tar.gz
$ cd whirr-0.8.0
 

Whirr will launch clusters for you in EC2 according to a “properties” file you pass it. It’s actually quite powerful and allows a lot of customization (and can be used with non-Amazon cloud providers) or allows you to set up complicated servers using Chef scripts. But for our purposes, we’ll keep it simple.

Create a file called hadoop.properties:

$ nano hadoop.properties
 

And give it these contents:

“”“

whirr.cluster-name=whirrly

whirr.instance-templates=6 noop

whirr.provider=aws-ec2

whirr.identity=<YOUR AWS ACCESS KEY ID>

whirr.credential=<YOUR AWS SECRET ACCESS KEY >

whirr.cluster-user=huser

whirr.private-key-file=${sys:user.home}/.ssh/id_rsa

whirr.public-key-file=${sys:user.home}/.ssh/id_rsa.pub

whirr.env.repo=cdh4

whirr.hardware-id=m1.large

whirr.image-id=us-east-1/ami-1db20274

whirr.location-id=us-east-1

 ”“’

This will launch a cluster of 6 unconfigured "large” EC2 instances.[4][5]

Before we can use Whirr, we’re going to need to install Java, so do:

$ sudo apt-get update
$ sudo apt-get install openjdk-6-jre-headless
 

Next we need to create that SSH key that will let our control node log into to our cluster. 

$ ssh-keygen -t rsa -P ''
 

And hit [enter] at the prompt.

Now we’re ready to launch!

$ bin/whirr launch-cluster --config hadoop.properties
 

This will produce a bunch of output and end with commands to SSH into your servers.

image

We’re going to need these IP’s for the next step, so copy and paste these lines into a new file:

$ nano hosts.txt
 

Then use this bit of regular expression magic to create a file with just the IP’s:

$ sed -rn "|.*@(.*)'| s/.*@(.*)'/1/p" hosts.txt >> ips.txt
 

Part II: Configure the Cluster

Cloudera is a company that (among other things) focuses on making Hadoop easier to use, and they’ve released two very helpful products that do just that. The first is the “Cloudera Distribution of Hadoop” (a.k.a. CDH) that puts all the hadoop/hbase code you need in one convenient package. The second is the Cloudera Manager, which will automatically install and configure CDH on your cluster. And it’s free for the first 50 nodes.

From your Control Node, download the manager:

$ wget http://archive.cloudera.com/cm4/installer/latest/cloudera-manager-installer.bin
 

Then install it:

 $ sudo chmod +x cloudera-manager-installer.bin 
 $ sudo ./cloudera-manager-installer.bin
 

This will pop up an extreme green install wizard, just hit yes to everything.

Somewhat frustratingly for a tool that will only run on Linux, Cloudera Manager is entirely web-based and works poorly with textual browsers like Lynx. Luckily, we can access the web interface from our laptop by looking up the public DNS address we used to log in to our control node, and appending “:7180” to the end in our web browser.

First, you need to tell Amazon to open that port. The manager also needs a pretty ridiculously long list of open ports to work, so we’re just going to tell Amazon to open all TCP ports to nodes that are within the security group that Whirr sets up automatically, and then open the port for the Admin console to the whole internet (since it’s password protected anyway.) That’s not perfect for security, so you can add the individual ports if you care enough (lists here):

 
$ ec2-authorize default -P tcp -p 0-65535 -o "jclouds#whirrly"
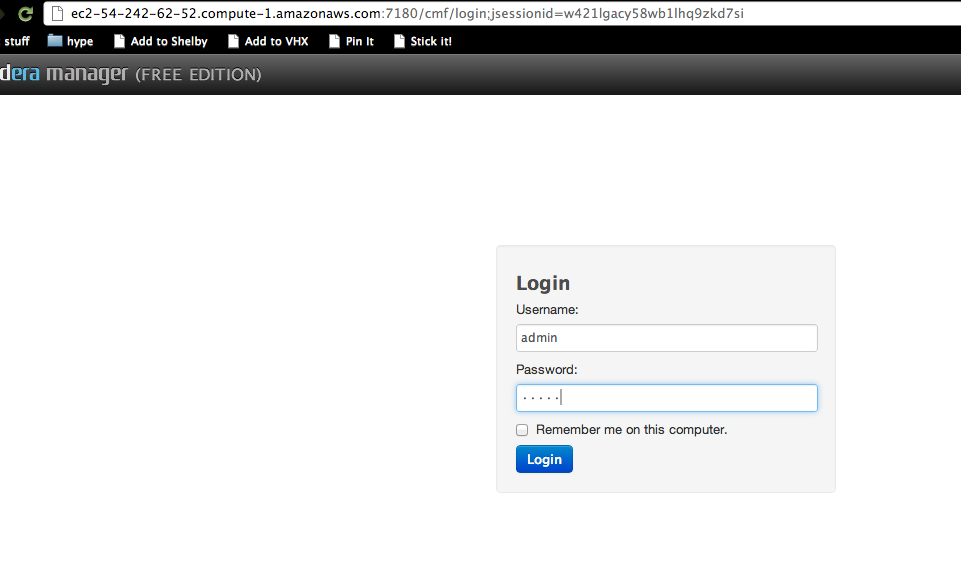
$ ec2-authorize default -P tcp -p 7180 -o 0.0.0.0/0 
$ ec2-authorize default -P udp -p 0-65535 -o "jclouds#whirrly"
$ ec2-authorize default -P icmp -t -1:-1 -o "jclouds#whirrly"
 

Then fire up Chrome and visit http://ec2-<WHATEVER>.compute-1.amazonaws.com:7180/

Log in with the default credentials user: “admin” pass: “admin”

image

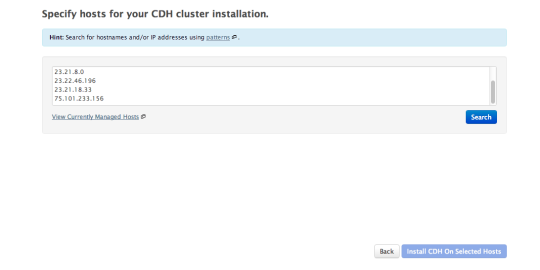
Click “just install the free edition”, “continue”, then “proceed” in tiny text at the bottom right of the registration screen.

Now go back to that ips.txt file we created in the last part and copy the list of IP’s. Past them into the box on the next screen, and click “search”, then “install CDH on selected hosts.”

image

Next the manager needs credentials that’ll allow it to log into the nodes in the cluster to set them up. You need to give it a SSH key, but that key is on the server and can’t be directly accessed from you laptop. So you need to copy it to your laptop.

 $ scp -r -i ~/.ec2/hadoop_tutorial.pem ubuntu@ec2-54-242-62-52.compute-1.amazonaws.com:/home/ubuntu/.ssh ~/Downloads/hadoop_tutorial
 

(“scp” is a program that securely copies files through ssh, and the -r flag will copy a directory.)

Now you can give the manager the username “huser”, and the SSH keys you just downloaded:

image

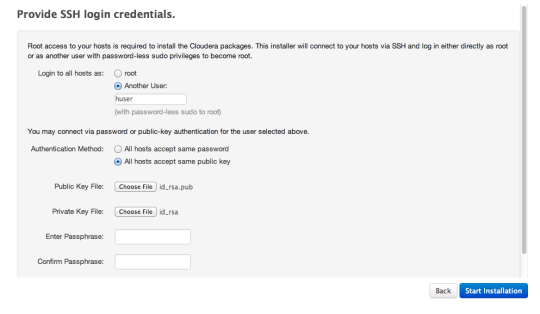
Click “start installation,” then “ok” to log in with no passphrase. Now wait for a while as CDH is installed on each node.

image

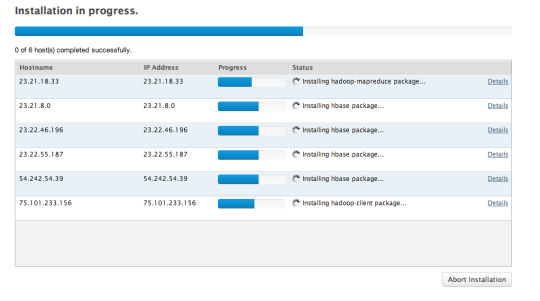
Next the manager will inspect the hosts and hit some warnings but just click continue.

Then the manager will ask you which services you want to start – choose “custom” and then select Zookeeper, HDFS, HBase, and MapReduce.

image

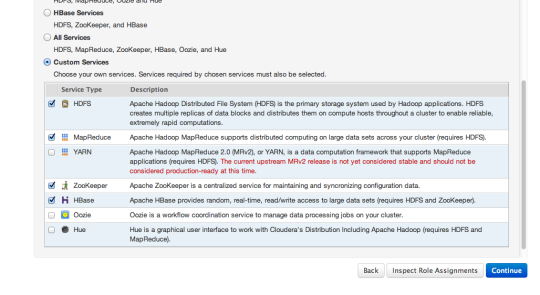
Click continue on the “review configuration changes” page, then wait as the manager starts your services.

Click continue a couple more times when prompted, and now you’ve got a functioning cluster.

Part III: Do something with your cluster.

To use your cluster, you need to SSH login to one of the nodes. Pop open the “hosts.txt” file we made earlier, grab any of the lines, and paste it into the terminal.

 $ ssh -i /home/ubuntu/.ssh/id_rsa -o "UserKnownHostsFile /dev/null" 
 -o StrictHostKeyChecking=no huser@75.101.233.156
 

If you already know how to use Hadoop and HBase, then you’re all done. Your cluster is good to go. If you don’t, here’s a brief overview.

“Hadoop” is an umbrella term for a set of services that allow you to run parallel computations. The actual workhorses are the Hadoop Distributed File System (HDFS, an actual UNIX-like file system), “MapReduce” (the framework that actually farms out programs to the nodes), and “ZooKeeper” (a routing service that keeps track of what’s actually running/stored on each node and routes work accordingly.)

The basic Hadoop workflow is to run a “job” that reads some data from HDFS, “maps” some function onto that data to process it, “reduces” the results back to a single set of data, and then stores the results back to HDFS. You can also use HBase as the input and/or output to your job.

You can interact with HDFS directly from the terminal through commands starting “hadoop fs”. In CDH, you need to be logged in as the “hdfs” user to manipulate HDFS, so let’s log in as hdfs, create a users directory for ourselves, then create an input directory to store data.

 $ sudo su - hdfs
$ hadoop fs -mkdir -p /user/hdfs/input
 

You can list the contents of HDFS by typing:

 $ hadoop fs -ls -R /user
 

To run a program using MapReduce, you have two options. You can either:

Write a program in Java using the MapReduce API and package it as a JAR

2)  Use “Hadoop Streaming”, which allows you to write your “mapper” and “reducer” scripts in whatever language you want and transmit data between stages by reading/writing to StdOut.

If you’re used to scripting languages like Python or Ruby and just want to crank through some data, Hadoop Streaming is great (especially since you can add more nodes to overcome the relative CPU slowness of a higher level language.) But interacting programmatically with HBase is a lot easier through Java[6]. So I’ll provide a quick example of Hadoop streaming and then a more extended HBase example using Java.

Now, grab my example code repo off Github. We’ll need git.

(If you’re still logged in as hdfs, do “exit” back to “huser” since hdfs doesn’t have sudo privileges by default)

 $ sudo apt-get install -y git-core
$ sudo su - hdfs
$ git clone https://github.com/rogueleaderr/Hadoop_Tutorial.git $ cd Hadoop_Tutorial/hadoop_tutorial
 

For some reason, Cloudera Manager does not see fit to tell the nodes where to find the configuration files it needs to run (i.e. “set the classpath”), so let’s do that now:

$ export HADOOP_CLASSPATH=/etc/hbase/conf.cloudera.hbase1/:/etc/hadoop/conf.cloudera.mapreduce1/:/etc/hadoop/conf.cloudera.hdfs1/
 

Part III(a): Hadoop Streaming

Michael Noll has a good tutorial on Hadoop streaming with Python here. I’ve stolen the code and put it in Github for you, so to get going:

Load some sample data into hdfs:

$ hadoop fs -copyFromLocal data/sample_rdf.nt input/sample_rdf.nt
$ hadoop fs -ls -R
(to see that the data was copied)
 

Now let’s hadoop:

 $ hadoop jar /usr/lib/hadoop-0.20-mapreduce/contrib/streaming/hadoop-streaming-2.0.0-mr1-cdh4.0.1.jar 
-file python/mapper.py -mapper python/mapper.py 
-file python/reducer.py -reducer python/reducer.py 
-input /user/hdfs/input/sample_rdf.nt -output /user/hdfs/output/1
 

That’s a big honking statement, but what it’s doing is telling hadoop (which Cloudera installs in /usr/lib/hadoop-0.20-mapreduce) to execute the “streaming” jar, to use the mapper and reducer “mapper.py” and “reducer.py”, passing those actual script files along to all of the nodes, telling it to operate on the sample_rdf.nt file, and to store the output in the (automatically created) output/1/ folder.

Let that run for a few minutes, then confirm that it worked by looking at the data:

$ hadoop fs -cat /user/hdfs/output/1/part-00000
 

That’s hadoop streaming in a nutshell. You can execute whatever code you want for your mappers/reducers (e.g. Ruby or even shell commands like “cat”.)[7]

Part III(b): The Hadoop/Hbase API

If you want to program directly into Hadoop and HBase, you’ll do that using Java. The necessary Java code can be pretty intimidating and verbose, but it’s fairly straightforward once you get the hang of it.

The github repo we downloaded in Part III(a) contains some example code that should just run if you’ve followed this guide carefully, and you can incrementally modify that code for your own purpose[8].

All you need to run the code is Maven[9]. Grab that:

(if you’re logged in as user “hdfs”, type “exit” until you get back to huser. Or give hdfs sudo privileges with “visudo” if you know how.)

$ sudo apt-get install maven2
$ sudo su - hdfs $ cd Hadoop_Tutorial/hadoop_tutorial
 

When you run hadoop jobs from the command line, Hadoop is literally shipping your code over the wire to each of the nodes to be run locally. So you need to wrap your code up into a JAR file that contains your code and all the dependencies[10].

Build the jar file by typing:

 $ export JAVA_HOME=/usr/lib/jvm/j2sdk1.6-oracle/
(to tell maven where java lives, since Cloudera also inexplicably doesn’t do it for you.)
$ mvn package
 

That will take an irritatingly long time (possibly 20+ minutes) as Maven downloads all the dependencies, but it requires no supervision.

(If you’re curious, you can look at the code with a text editor at /home/users/hdfs/Hadoop_Tutorial/hadoop_tutorial/src/main/java/com/tumblr/rogueleaderr/hadoop_tutorial/HBaseMapReduceExample.java). There’s a lot going on, but I’ve tried to make it clearer with comments.

Now we can actually run our job.

$  cd /var/lib/hdfs/Hadoop_Tutorial/hadoop_tutorial
$ hadoop jar target/uber-hadoop_tutorial-0.0.1-SNAPSHOT.jar com.tumblr.rogueleaderr.hadoop_tutorial.HBaseMapReduceExample
 
If you get a bunch of connection errors, make sure your classpath is set correctly by doing:
 
$ export HADOOP_CLASSPATH=/etc/hbase/conf.cloudera.hbase1/:/etc/hadoop/conf.cloudera.mapreduce1/:/etc/hadoop/conf.cloudera.hdfs1/
 

Confirm that it worked by opening up the hbase commandline shell:

$ hbase shell
hbase(main):001:0> scan "parsed_lines"
 

If you see a whole bunch of lines of data, then…congratulations! You’ve just parsed RDF data using a 6-node Hadoop Cluster, and stored the results in HBase!

Part IV: Next Steps

Believe it or not, you’re passed the hardest part. In my opinion, the conceptual difficulty of understanding (at the least basics) or how to use Hadoop and HBase pales in comparison to the difficulty of figuring out how to set them up from scratch.

But it’s still not trivial. To use Hadoop, you need to understand the Map-Reduce programming paradigm to make sure that you’re actually taking advantage of the power of parallel computing. And you need to understand the HBase data model to use it (on the surface, it’s actually quite similar to MongoDB.)

And if you want real performance out of your setup, you will eventually need to understand all the complicated configuration options I’ve glossed over.

All that’s a tall order, and beyond the scope of this guide. But here are some resources that should help:

If you’re planning on doing serious work with Hadoop and HBase, just buy the books:

Hadoop, the Definitive Guide

Hbase, the Definitive Guide

(Don’t worry, I’m not getting affiliate revenue.)

The official tutorials for Whirr, Hadoop, and HBase are okay, but pretty intimidating for beginners.

Beyond that, you should be able to Google your way to some good tutorials. If I get time, I’ll try to write a post in the future with more information about what you can actually do with Hadoop and Hbase.

I hope you’ve enjoyed this article. For more, follow me on Twitter! And if you’re curious about my project and potentially interested in helping, drop me a line at george (DOT) j (DOT) london at gmail.

(As I mentioned above, these are the learnings of a n00b and there are probably better ways to do most of this. Please post in the comments if you have suggestions! Also, I can’t figure out how to let the Cloudera Manager access the logs or Web UI’s on the nodes, so please let me know if you can figure that out.)

Footnotes:

[1] Resource Description Framework, used for publishing data in an easy-to-recombine format.

[2] The speedup is only really linear if your program is CPU-constrained and parallelizable-in-principle. If you’re I/O bound, parallelization can still help but it requires more intelligent program design.

[3] Elastic Compute Cloud is Amazon’s service that lets you create virtual servers (a.k.a. “instances”.) They also provide a number of other services, but EC2 is the big one.

[4] For some reason, Whirr refuses to create small or medium instances, which is frustrating because large’s are overkill for some tasks. Please let me know if you know how to launch smaller instances.

[5] As I painfully learned, the trick to making Whirr work with the Cloudera Manager is to create un-configured “NO-OP” instances and let the manager handle all the configuration. If you use Whirr’s “hadoop” recipes, the configurations will clash and the manager won’t work.

[6] Interacting with HBase is tricky but not impossible with Python. There is a package called “Happybase” which lets you interact “pythonically” with Hbase. The problem is that you have to run a special server called “Thrift” on each server to translate the Python instructions into Java, or else transmit all of your requests over the wire to a server on one node, which I assume will heavily degrade performance. Cloudera will not set up Thrift for you, though you could do it by hand or using Whirr+Chef.

[7] If you want to use non-standardlib Python packages (e.g. “rdflib” for actually parsing the RDF.), you need to zip the packages (using “pip zip [package]”) and pass those files to hadoop streaming using “-file [package.zip].”

[8] The basic code is adapted from the code examples in O’Reilly “HBase, the Definitive Guide.” The full original code can be found on github here (github.com/larsgeorge/hbase-book).  That code has its own license, but my marginal changes are released into the public domain.

[9] A Java package manager, which makes sure you have the all the libraries your code depends on. You don’t need to know how it works for this example, but if you want to learn you can check out my post here, which is partially an introduction to Maven.

[10] There are other ways to bundle or transmit your code, but I think fully self-contained “fat jars” are the easiest. You can make these using the “shade” plugin which is already included in the example project. 

(edit: fixed code formatting)

Setup a (basic) publicly accessible website in an hour with Django and Pinax

This guide should be enough to get you up and running with a (bare-bones) functional, publicly accessible website in just a few hours. 

We’re going to accomplish this using Pinax, an open-source project that aims to “deal automatically with what most websites have in common, and let you focus on what makes your site unique.”

Pinax is made up of several components. The core is a tool that generates new Django projects, configures them to work out of the box, and installs some “django apps” which provide basic essential website functionality. (As you hopefully remember, Django is designed to work with modular apps that let you easily package and install reusable bits of functionality.) In addition to the core apps, Pinax also provides a number of additional apps you can install that provide extra bits of functionality like managing user accounts or enabling basic social networking. Finally, Pinax provides starter projects that provide “out of the box” websites with various configurations of apps pre-installed.

So at a very high level, the steps we’re going to go through are:

1)   Set your system up to use Pinax

2)   Choose a starter project that suits your needs

3)   Use Pinax to generate the project

4)   Install any other apps you want

5)   Customize your website!

6)   Put it all online

I’ll walk you through the whole process step-by-step

1: Set your system up to use Pinax

Start by following the basic setup directions from the Pinax Documentation here.

 In short:

1.     Create and activate a virtual environment (which helps you make sure that you’re using the right versions of the right packages for your project, without worrying about accidentally upgrading a package a different project depends on.)

2.     Install Pinax inside your virtual environment (`pip install Pinax`)

The official documentation for this step is good, so follow it for more detail.

2: Choose a starter project

The starter project you choose will serve as the foundation of your website. You can either start with the extreme barebones and install all the apps you want one-by-one, or you can The next step is to pick a “starter project” to use as the foundation of your project. 

Most Pinax starter projects fit into three categories:

Foundational projects are intended to be the starting point for real projects. They provide the ground-work for you to build on with your domain-specific apps. Examples of foundational projects are zero_project and account_project.

Demo projects are really just intended to showcase particular functionality and demonstrate how a particular app works or how a set of apps might work together. You probably wouldn’t use them to kick off your projects (other than to get ideas) and they aren’t intended to be used for real sites.

Out-of-the-box projects are intended to be useful for real sites with only minor customization. That is not to say they couldn’t be highly modified, but they don’t need to be, beyond things like restyling.

Currently, Pinax only officially provides four foundational projects for you to use, though the developers intend to add some Out-of-the-box projects soon. You can also find some old starter projects in the old Github repo, but these are no longer supported and may have broken dependencies, so use at your own risk.

To see a full list of the officially supported startup projects, type

`pinax-admin setup_project –l`

See here for more details on the official starter projects.

In this guide, I’m going to use a partially configured project “account” that includes the most essential infrastructure apps plus basic user registration. Right now, setting up accounts if you start with the “zero” project is a little tricky (though the developers are planning on fixing that very soon.) From there, I’ll then walk you through the whole process of getting from zero to hero.

3: Use Pinax to generate the project

So, create a new directory where you want your project to live (this nested structure will make it easier to deploy your website in step 6). Cd into that directory, and from there (and with your virtual environment activated), type

`(mysite-env)$ pinax-admin setup_project -b account mysite `

Your system should create a new subdirectory and install the required packages. Now you’ve got a working Django project. Get it started by running

`(mysite-env)$ cd mysite`

`(mysite-env)$ python manage.py syncdb `

`(mysite-env)$ python manage.py runserver `

syncdb will create a SQLite database named dev.db in your current directory. We’ve configured your project to do this, but you can change this simply by modifying settings.py where DATABASES dictionary is constructed. You can find more information about this at the get your database running Django documentation.

runserver runs an embedded webserver to test your site with. By default it will run on http://localhost:8000. This is configurable and more information can be found on runserver in Django documentation.

Go ahead and create a git repo now:

`(mysite-env)$ git init`

`(mysite-env)$ git add .`

`(mysite-env)$ git commit –m “initial commit”`

So now you’ve got a website! Check it out and smile.

4: Install whatever apps you want

Your new website is pretty (because it uses Twitter Bootstrap open-source styling), and has some solid core functions (users can register, change passwords, etc.) But you’re going to want more than that.

To add functionality, we add prepackaged Django apps (or write our own). You can find an extensive directory of apps designed to work with Pinax here. I’ll walk you through installing some apps to get a site with some actual functionality.

If you’re not super familiar with Django, the process of installing and using Pinax apps can seem a bit mysterious. The key thing to remember is that apps are just bundles of code (and sometimes templates) that extend the core codebase of your project. Let’s walk through an example and see how everything works.

Let’s start with the “idios” app, which adds profile functionality to Pinax. You can find detailed installation instructions here, but I’ll repeat the basics.

1.     In most cases, you’ll be able to simply type `pip install this_app` (from within your virtual environment, of course!). But for some of the apps that don’t yet have stable releases, pip won’t work automatically. The way that Pinax handles required packages is to put a /requirements directory inside of your project folder which has two files, “base.txt” and “requirements.txt”. Base.txt contains the default packages that were installed with your starter project, plus extra URL’s that tell pip where to look for packages that aren’t in the standard Python Package Index. If you used Pinax-admin to create your project, your base.txt file should already have an extra URL for Pinax apps that are still under development. The other file, project.txt, lets you specify other packages that your project needs. So to install idios:

a.     Open myproject/requirements/project.txt

b.     Add the line “idios”  (In the future, the Pinax developers are planning on providing a list of the latest versions of the different apps so that you can specify which version to use and avoid accidental incompatible upgrades. But that’s not available yet, so just add the name without a version and pip will automatically grab the latest version)

c.      In the terminal (with your venv activated), typed `pip install –r requirements.txt`

d.     Idios (and any other packages you’ve specified but not downloaded yet) should install themselves

2.     Now that we have the package, we need to make Django use it. So open the settings.py file in your project and in the ‘installed apps’ list add:

INSTALLED_APPS = [   

            …

# external

     "idios", ]

3.     Hook up idios to your urlconf file (urls.py)

urlpatterns = patterns(“”,

#          …

url(r”^profiles/”, include(“idios.urls”))

            )

So what actually just happened? You’ll notice that no new files were actually added to your project directory, so where is the extra functionality coming from and how do you use it?

They key is to remember how Python goes about finding code ot use in the first place. When you reference a function in Python, it will sequentially tick down your PATH variable (i.e. the list of places where code packages are included) looking for appropriate bits of code to use. So if you have an actual app folder inside of your project (e.g. if you created your own Django app in this project), Python will look for the code there. If not, and if you’ve included a package name in your “installed apps” list in Settings.py, it will look inside your site packages directory (which will be inside of the virtual environment you created for this project.)

As a shortcut, you can find that directory by typing `cdsitepackages` in the terminal. Do an `ls` inside this folder and you’ll see all the packages you have installed. Note that ‘idios’ is in this list and cd into the directory. This is where all the code for the idios app lives. Unfortunately, most of the current Pinax apps are not extensive documented, so you’ll by and large have to figure out how they work by reading the code.

Take a look at the idios/urls.py folder. Remember above how our urlconf said “url(r”^profiles/”, include(“idios.urls”))” The include means urls your project received that contain ‘profiles’ are being syndicated out to the urls.py file inside the idios package. The urlconf there references functions in the idios/views.py file.

If you want to modify the functionality of an app, you should copy the entire folder into your apps directory of your project, which will put it higher in your path than the site-packages version. That will let you change the code while still keeping your environment reproducible.

5: Customize your site

Awesome. By now, you should have a functional website that allows user registration. You can even got straight to deployment and make this site publicly accessible as is (see Step 6). But you probably don’t want your site covered in filler text and “example.com”. So let’s start making this site your own.

First, let’s change the names that appear throughout the site. Open the file mysite/fixtures/initial_data.json, and change ‘name’ and ‘domain’ to whatever is appropriate. Then in the terminal, run `python manage.py syncdb` to update everything.

Now a word about the Pinax template structure. By default, your project folder will have a templates folder which contains a few basic templates. Most of these inherit from “banner_base.html” or “theme_base.html” which are located inside “Pinax_theme_bootstrap” app which is inside of the site-packages section of your virtual environment.

In Django, the template processors work much like the app PATH; your settings.py file has a template loaders section that looks like this

` # List of callables that know how to import templates from various sources.

TEMPLATE_LOADERS = [

    “django.template.loaders.filesystem.load_template_source”,

    “django.template.loaders.app_directories.load_template_source”,

]`

This tells Django that it should first check for templates inside your project folder, then should look inside the apps you have installed. In Pinax, the bootstrap theme is packaged as an app, so the template loader knows to look for templates that get referenced inside of the apps folder. Remember that you can find the source code for your installed apps by typing `cdsitepackages`.

Several of the other installed apps like ‘account’ reference templates that are also held inside of the bootstrap theme.

If you want to modify any of these templates (which you probably will to some extent as you personalize your site), just copy the relevant templates from the bootstrap folder into the templates directory in your project folder. If the templates are inside of folders (e.g. /account/signup.html), make sure that you keep them inside of folders inside of your templates directory.

Let’s try giving ourselves a custom 404 page.

1.     cdsitepackages

2.     cd pinax_theme_bootstrap/templates

3.     cp 404.html  mysite/templates/

4.     emacs 404.html

5.     add something crazy

6.     open settings.py and change the DEBUG flag to False

7.     Load up a broken page, and see your glorious new error

Using these pretty simple customization processes, you should be able to build yourself a full production website. Remember to aim for modularity, and if you build anything useful, consider contributing it back into Pinax!

6: Deploy your app on the web

Pinax is produced by the guys at Eldarion. They also produce Gondor.io, a platform-as-a-service solution that allows you to automatically deploy Django websites to production. So naturally, using Gondor.io is the fastest way to get your Pinax-based website online and publicly accessible.

To use Gondor.io, just head over to their website and sign up for an account. Then follow the directions to configure your website to use Pinax.

At the time of writing, those directions are clear and accurate, with two exceptions

1.     ignore the instruction about changing the WSGI entry in your .gondor/config file (which will be clear as you follow the instructions.)

2.     In your .gondor/config file, edit the line `staticfiles = false` to say `staticfiles = true`

Do all of that, type `git push primary master`, and you’ve got a live website. Surf over to dyn.com/dns (or your favorite dynamic DNS provider) and set up a dynamic DNS entry to make your personal domain point to your shiny new website.

Congratulations. You’ve got a fully functional publicly accessible website!

[Quickstart] Using Neo4j and Tinkerpop to work with RDF. Part 1!

[Warning: This is another super-technical post. If you don’t know what the Semantic Web and RDF are, this will be incomprehensible.]

In my last post, I talked about my attempt, as a novice programmer currently capable of only rudimentary Python and not much else, to use Neo4j as an RDF triple store so that I could work with the DBpedia dataset on my laptop. Tinkerpop is an open-source set of tools that lets you magically convert Neo4j into a fully functional triplestore. 

My conclusion from that attempt was that using only Python to set up and control Neo4j for RDF is basically impossible. 

To reiterate why I’m doing this in the first place: the DBPedia dataset is fascinating and I want to explore it. But the web interface has frustrating limitations (especially the fact that it will simply time out for non-trivial SPARQL queries, and also that I can’t easily download the input to feed into other programs.) So, I want to host the data locally so that I can let my laptop chug away for as long as I damn please answering my queries. 

I’m still determined to accomplish that goal, so my new plan is to just bite the bullet and teach myself “just enough Java” (JeJ. Palindr-acronym!) to make this all work. I’ve hesitated to learn Java, since it is, well…extremely daunting

As of six months ago, I knew basically nothing about programming. Since then, I’ve taught myself rudimentary Ruby (+ Rails) and rudimentary Python (+ Django), both of which are very nice, syntactically simple languages with excellent online “getting-started” resources. For Ruby, I recommend The Little Book of Ruby, or if you’re in for a more psychedelic experience,  The Poignant Guide to Ruby. For Rails, I used Michael Hartl’s online Ruby Tutorial (there’s a link to a free HTML version buried on that page somewhere.) For Python, you can’t go wrong with Learn Python the Hard Way. MIT’s Open Courseware Site also has an entire intro to CS class in Python. For Django, I’m working my way through the Django Book. Both languages also have strong, enthusiastic communities in New York which you can easily connect with in person through www.meetup.com. If I get a chance, I’ll write another post sharing all the cool resources I’ve found from trying to learn Ruby and Python.

Now for Java, on all of those points…not so much.

From my perspective as an outsider and a novice, the Java ecosystem looks huge, fragmented, confusing, and uninviting

Now I will freely concede that I don’t know shit about Java (that’s why I’m trying to learn!), so many of things I say in this post may be deeply ignorant and wrong. If so, please point out any errors/idiocy to me and I’ll happily correct myself.

In this post, I’m going to try to walk you through the whole process of going 

FROM: Knowing nothing but a simple scripting language like Python

TO: Knowing enough Java to set up and run a publicly accesible Neo4j server that uses Tinkerpop to process and serve RDF data. 

I’m going to try to stick as few steps as possible so that you can follow along even if you’re a true beginner like me. I am going to have to presume that you know enough about the Semantic Web to know what RDF and SPARQL are and why you’d want to use them. If you don’t, that’s just too big a subject to tackle here, though I will try to eventually write an introductory blog post about those too. In the meantime, you can start with wikipedia for a brief overview of RDF and SPARQL, or learn the hard way by reading the W3C specifications for RDF and SPARQL.

So:

STEP 1: Make sure you have Java.

This post presumes that you’re using a Mac. Speaking as a long-time Mac-avoider who just recently ditched his Windows laptop for a new Macbook – if you’re using Windows and want to develop modern software, you need to get a Mac. Just do it.

(Protip: buy used. I got a five-day old Macbook Pro for $2k on Craigslist. It actually had a faulty battery, so the Apple Store gave me a brand new one, no questions asked. Ebay also has substantial markdowns. And if AppleCare is not included, SquareTrade warranties are apparently 90% as good for 50% of the cost.)

So, the basic way that Java works is:

1) You write some code, and save it in a .java file.

2) You compile your source code into .class files, which I presume are in byte-code.

3) A magical machine called “the Java Virtual Machine” magically translates your bytecode into binary which can be executed on whatever system you’re using. The JVM is what makes Java portable to so many different systems…you only have to write code that’s compatible with the JVM, which is the same on every system. Making the JVM compatible with the chipset in your refrigerator is someone else’s job

So, from what I can tell, “having Java” on your computer means two different things:

1) You have “the Java Runtime Environment”, or “JRE”, which contains the JVM and lets your computer execute precompiled Java code.

2) You have “the Java Development Kit”, or JDK, which contains all the machinery to compile your raw Java source code into bytecode.

Some blogs are claiming that Apple has stopped shipping a JDK since Lion, though you probably have a JRE. I can’t honestly remember what was installed on my laptop when I got it, but to figure out what you have vs. need, just open a console and type:

% java -version

If you don’t have a JDK, you will apparently get explicit instructions on how to get one from Apple. (Oracle apparently just doesn’t feel like supporting Mac). You can also download the latest JDK and updates from the Apple Developer download site. I can’t find a static link but it should hopefully be obvious what to click. This stackoverflow post also has instructions. The latest version seems to be JDK6, though there seems to possibly be a version 7 on the near horizon.

STEP 2: Get Eclipse

Unlike Python, which is happy to run your hello_world.py script by itself in some random folder, Java has fairly rigid requirements for how the filesystem of your project has to be laid out. So while you probably could do everything in emacs, you can save yourself a lot of pain by using an IDE. 

One of the most widely-used open source IDE is called Eclipse. In addition to being free, it has a plugin system that makes it (reasonably) easy to add in new functionality. Neo4j will ask us to install some plugins, so I recommend that you just use Eclipse for you development, unless you have a strong reason not to. You can download it here. Just unzip it and put the decompressed folder in whatever folder you want to keep your Java stuff in (for me it’s /Users/rogueleaderr/Programming/Java).

For some reason the drag-the-app-icon-into-your-applications-folder-to-install-on-Lion didn’t work for me (the app wouldn’t launch), but I was able to just put an alias to the app icon into the applications folder and thus add Eclipse to the launch dock. 

STEP 3: Get Maven

Don’t you love how simple adding new packages in Ruby is? Isn’t “gem install cthulu-mod” easy and intuitive? Well, forget about that. 

You’re going to be using Maven now. I’m still figuring out exactly what Maven does, but my understanding is that it’s a package manager on steroids. If you have Maven installed, you put an xml file “pom.xml” inside each Java project you do, and it specifies the complete structure and all dependencies of your project. So if you download someone else’s project, you can use Maven to automatically make sure that you have everything you’re going to need to run that project. I recommend scanning the wiki page for a quick overview of what Maven does. 

To me, typing in “gem install XYZ” three times sounds easier, but hey… 

You can download Maven from the Apache website here. Follow the directions on that page to install on Mac. Basically, decompress the file then put it where Apache tells you to, then add it to your shell path. (To add to your shell path, open your .bashrc or .zshrc file, which is a hidden file located inside your home directory “ ~/ ”. If this file doesn’t exist, just create it by typing “ % emacs .zshrc ” (or whatever your preferred text editor is). Then paste in the lines from the Apache install directions. Make sure you enter the right file locations, as I learned the hard way.) 

STEP 4: Get Neo4j

As you hopefully know if you’ve read this far, Neo4j is a graph database. While I’ve been told that a graph database is theoretically formally equivalent to a relational database and can be used for almost all of the same things, graph databases are naturally particularly good at representing graph structures. RDF data naturally forms a graph structure, meaning that Neo4j is naturally pretty well suited for hosting RDF. 

Neo4j is not as naturally well suited for RDF as a dedicated triplestore like Sesame or OWLIM. But it has one key advantage, which is why I’m testing it out in the first place:

The free open source version is apparently capable of working with billions of triples. Sesame works fine with up to ~100m triples, but even the pared down DBPedia dataset I’m trying to work with has around 1.5bln. My first attempt to “damn the torpedoes” and load everything into Sesame lead to some bizarre behavior. There are commerical solutions like OpenLink Virtuoso and Ontotext OWLIM which claim to work with 10bln+ triples, but those are rather expensive.

Hence, Neo4j gets my attention for now.

Neo4j comes in two forms:

1) A standalone server which you can get by clicking the download button on the Neo4j homepage. The upside of the standalone sever is that you can control it through REST. So if you want to stick with Python, this is probably the way to go. Neo4j does have some embedded Python bindings, but they’re fairly limited. The downside of the standalone sever is that, as far as I know, there is no way to use additional plugins like Tinkerpop, so you’re limited to what Neo4j can do out of the box. 

2) A set of Java libraries. This is what we’re going to need, so that we get the full range of control and so that we can use Tinkerpop. Neo4j has a fairly extensive manual which explains how to get these libraries (the specific page is here.) Follow the directions there (including potentially installing an Eclipse plugin called M2Eclipse to let you use Maven directly inside of Eclipse. On my Eclipse install, M2E was already installed, but I’m not sure how to check the full plugin list (Eclipse is pretty freakin’ complicated). But if you open Eclipse–>Preferences and see a line for “Maven”, you’re probably good.

STEP 5: Learn Java

And this is where the paved roads end. From here on out, we’re going to be tying everything together directly in Java, and fighting bugs and dinosaurs as they attack.

User-friendly resources for learning Java seem to be rather scarce (please let me know if you find any.) My solution pro tems is to just go directly to the Oracle Java Tutorial and work through it. Obviously this leaves you about 3652 days short of the ten years you’re going to need to be any good at Java. But assuming you already know the basics of some object oriented programming language, it will give you just barely enough to muddle your way through getting this basic setup working. And crucially, it will teach you how the Java package system works, which is not particularly intuitive but will be crucial if we want to use Tinkerpop. 

STEP 6: Get Tinkerpop

Well, I hope you enjoyed learning Java. That must have taken a while. You did go learn Java, right?

Well, just in case you didn’t – I’ll walk you through how to create a Neo4j interface using Tinkerpop. Most of this is ripped directly off of a recent blog post by Davy Suvee, found here. Davy provides some very helpful code, but he assumes a high level of Java fluency. I, on the other hand, will assume that you know no more than I do (i.e. nothing.)

So, start by reading Davy’s post. If you can follow and implement that, you don’t need me!

If not, then let’s start by downloading Davy’s code. Head over to the Github repository. If you don’t know how to use Github, Google yourself a tutorial…it’s pretty easy. 

Now, within Eclipse, go to File –> Import. A dialog will pop up. Click Git –> Project From Git

Now click Next. Then copy in the URL of Davy’s project –  https://github.com/datablend/neo4j-sail-test.git – last I checked. Now click “
clone.”

Make sure url is autopopulated in the next window, and click next again. You shouldn’t need to enter any github credentials to do this, but if you get an error, try entering yours (definitely worth signing up for a free account if you don’t have one.)

Just click next on the next screen:

And on the last screen, make sure you’re creating the repo where you want it. Then click finish. The repo should download. Eclipse will bring up the original import screen again, but just close it. 

Now you have the files! But what to do with them? 

For some reason, Eclipse does not let you open projects. ಠ_ಠ 

So what you have to do is:

1. Create a new Java project. Make sure your Eclipse workspace is set to the same folder where you cloned the project off of Github (go to File – > Switch Workspace if it’s not). Give the new project the same name as the github repo you cloned. Click okay, and Eclipse should automatically open the neo4j-sail-test project.

2. Now you should have a project open in Eclipse, and you can get started trying to fix all the dependency errors and make this code run. 

3. To do that, we’re going to have to get the actual Tinkerpop libraries, and add them to our “classpath”, which is what Java uses to figure out where to look for the files you tell it to import. 

That’s hard. And I will try to figure that out tomorrow…stay tuned for part 2.